Jul 31, 2013

WOYWW : 217


A bit late in the game today, but this is my workdesk Wednesday morning.  Working on a layout using a gorgeous new Mercantile kit and decided to go big with my Silhouette today, we'll see what happens.  Trying to place all my kit goodies so I can see everything and still have a place to work hence the pedestal thingy.  Speech bubbles are one of the themes to this kit ... love them because I can think of 20 layouts that can use speech bubbles right off the bat.

It's a beautiful day here in Connecticut and I must get moving and creating!

Check out Julia the WOYWW originator extraordinaire!


Jul 30, 2013

Creative Tuesday : The Animated Gif


How about some creative tech?

I bought my Nikon digital SLR in 2008.  There was no movie function in the camera in 2008 - that came later.  I can't lie - I would get a bit envious of everyone with movie functions built into their cameras and phones.

I knew there was a way to use animation in Photoshop Elements to get some kind of cute action going on but in my previous version of PSE (9 i think), there was a bug in creating an animated gif .  And true to Adobe form, even though it was a recognized bug, there would not be a fix until a later version.  Fast forward to PSE 10 and the animation bug was fixed.

If you take a series of photos using a rapid fire shutter you'll have sequence when put together as an animated gif, will form a cute animation as seen by the "singer and her background dancer" below.


This is a sequence of 8 photos shot rapidly.  I resized them to a workable size and layered one photo on top of another in PSE. I highlighted each photo in the psd file, chose "file" > "save for web" and ticked the box for ".gif"and then "animation".  You are able to change the timing in between frames at the bottom of the page.

OK - so it's not a true video, but it's cute, isn't it?  Just one way to get creative with your computer.

Have a Creative Tuesday!


Jul 23, 2013

Creative Tuesday : Those Awesome Asterisks*


Aren't asterisks awesome?  Many fonts contain asterisks as a symbol or glyph in their character set and,  depending on the font, can take on a variety of appearances.  They can look like stars ("asterisk" is derived from a Greek word meaning "little star"), snowflakes, pinwheels, flowers, and even fireworks (see Precious font below).  They can have distressed, elegant, modern, retro, or hand drawn styles.

Here is a list of some of my favorite asterisks and the fonts they came from:


I was playing around with my Silhouette Cameo the other day, trying to cut something which could resemble a "dandelion top" - or a "flower top made up of tiny flowers".  I wanted to use this as a background for a layout.  Strange, yes. But once I got this idea in my head, I needed to figure it out.  I was playing around with asterisks in the Silhouette program and the font Apple Casual had a very cute asterisk similar to what I was looking for.  I used various sizes of this asterisk to cut the background for my layout.

Supplies:  Jenni Bowlin  Studio Cardstock Feathers | JBS Mini Chipboard Pieces Stars | background paper by Echo Park | glitter | photo corners | gesso | fonts: Apple Casual (for Silhouette cut); My Mother's Type; Lavanderia

I also used some of the little flower confetti that was made from the cuttings.


I love that little asterisk!  So don't forget to check your asterisks if you want a particular image.  It might just be what you were looking for!

Have a Creative Tuesday!


Jul 20, 2013

And After 3 Years ...

... it's done.

I finally finished ds#1's High School Baseball book.  Sound the trumpets!

Finishing this up now, three years later, I think I might have done some things differently.  That's what happens when it takes 3 years to finish something. But my son will LOVE it.  He's away this weekend at a retreat, and a burst of energy came over me.  It was the perfect time to finish this up.

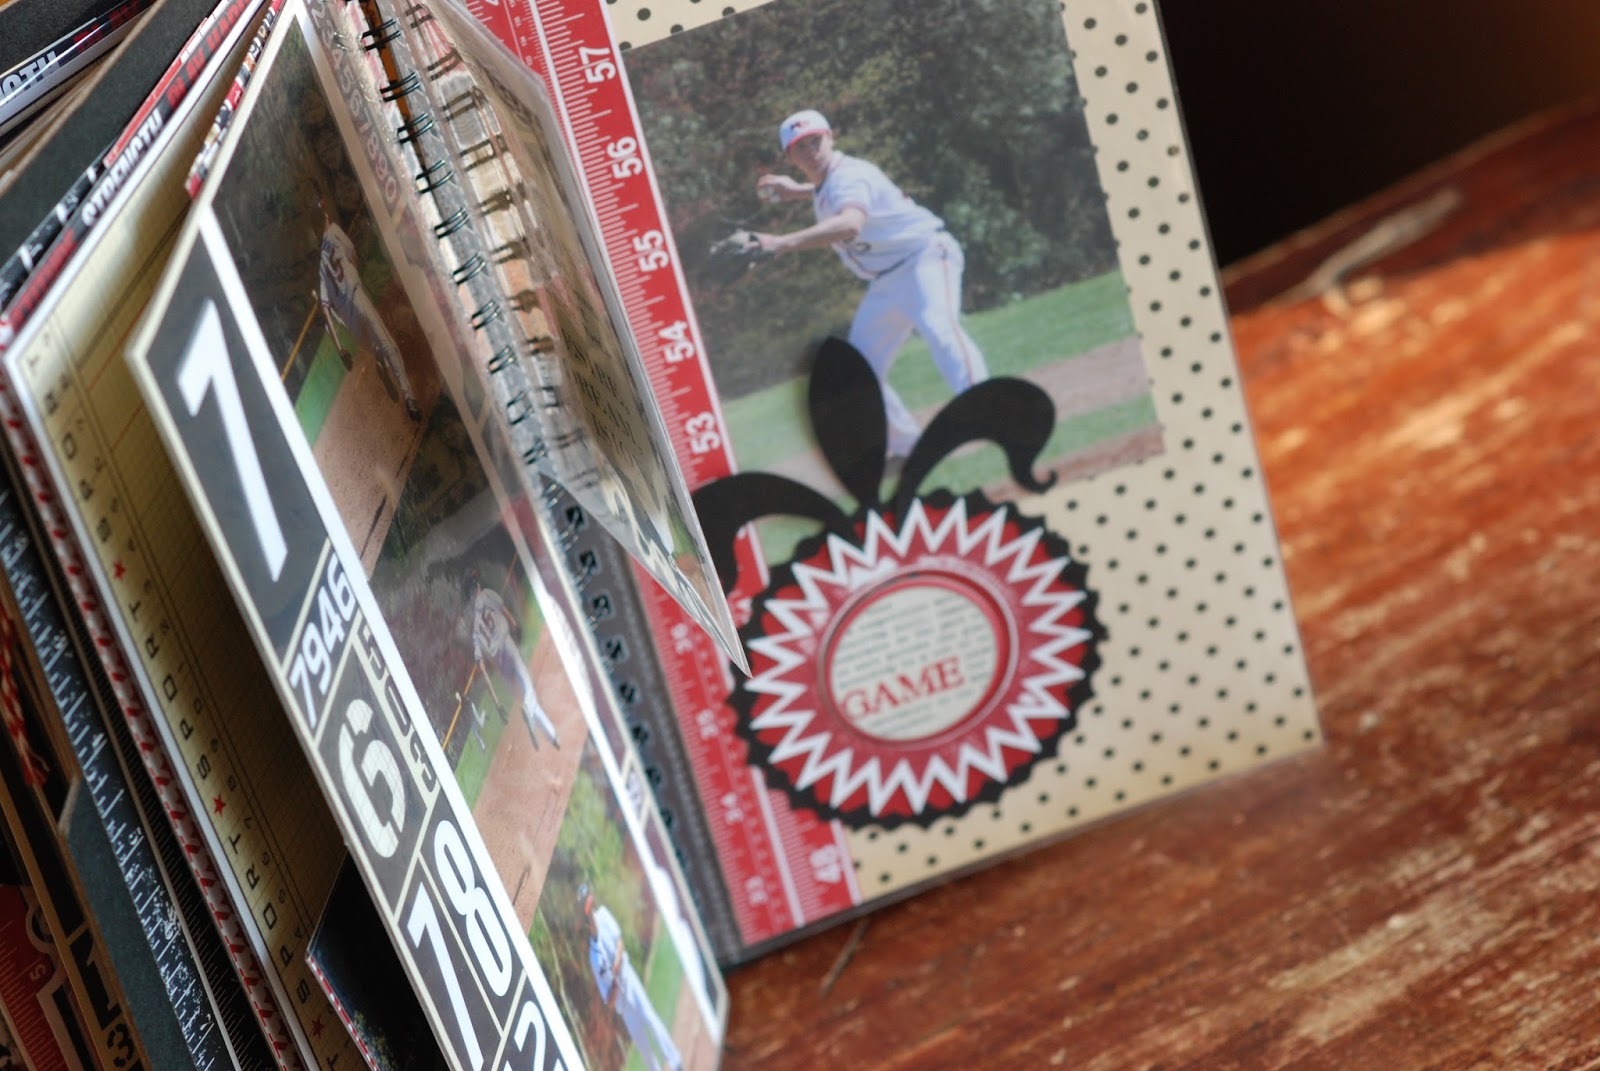
When John was a HS senior, I found the red/black/white sports mini album kit by Teresa Collins.  These are the colors of our high school, so how perfect was this?  I bought two (for each son) and got some friends to buy one also.


We got together only once to work on this as a group.  We probably drank more wine than actually worked on the album, and my non-scrappy friends made me laugh ("What if I get ink on my hands?"), but this was the start.

Add the perfect American Crafts Thickers, and anything red and black from Jenni Bowlin Studio, and I had the best collection of supplies to get this done.


After day one, this was promptly stored away and I didn't work on it again until a weekend crop with my friend Amy.  Amy had brought Slice to the crop and generously let me use it, so add various Slice images to the mix and the book was taking on an even different look.


Fast forward to yesterday!  I had a lot of newer items in my stash that were perfect for the album - especially Jenni Bowlin Studio stamps, flatbacks, rhinestone stars, and stickers.  Friday was spent finishing freshman year (I had "lost" the photos) and adding these goodies to the rest of the book.


I thought I was finished late last night, until I saw the three blank chipboard tab pieces peeking out from the book.  The Hear Ye Hear Ye Banner Stickers worked great for these.


I have some blank pages that I'll leave for ds to add whatever he wants, I messed up the binding a bit, and as I said, there are some things if I was doing this start to finish now that I would change.

But I showed ds#2 my finished project and he carefully opened and looked at every single page:

ds#2: "This is amazing. He's going to love it."

me: > sigh of relief <

ds#2: "Where's mine?!"

And so the next project begins ... !


Have a great and creative weekend!

Jul 17, 2013

WOYWW : 215


My desk is a bit cleaner today!


I'm finally finally FINALLY on my way to getting a UFO done. I just have to finish up my oldest's freshman season and his high school baseball album will be done.  I found the photos which is a HUGE part of the procrastination! Please note - in September he will be a senior in college.  Yikes!

Next to that is my next layout project. I made that cutting file from a font - it's supposed to look like dandelions??? hmmmm.  I have to decide if the base will be white flowers on kraft or kraft flowers on white.  I'm thinking white flowers on kraft ....

Up at the top, you can barely see, is the layout I sketched out first. I almost always sketch first.

And to the left of that is an office store steal - 50 cents for a package of Martha Stewart cord labels. You know - so you can wrap up your cord and label it. I've got so much cord all over the place.

That's it for me!  Can't wait to see what others have on their workdesk!  Thanks Julia!


Jul 16, 2013

Creative Tuesday : Organizing Blending Foam


I've had a hard time trying to keep my blending foam organized so I'd be sure to use the same foam for the same ink color.  I've been tempted to buy a blending tool handle for each color, but have a hard time justifying the cost.  I'm using this idea that's working for me so far.


I cut a small piece of the male end of velcro and stuck it to the underside of my ink pads.  The "male end" velcro will hold the "female end" of the blending foam.  In this way, the foam stays with the ink pad it is used with.


When you want to use the foam piece, simply peel it off the ink pad and add it to your blending tool.

The only downside to this method is that the ink pads can't be stacked tight because of the foam sitting in the bottom.  I can still stack them, just not tightly, in a drawer.  This little disadvantage doesn't outweigh the convenience of having the correct foam piece handy however!

Have a very Creative Tuesday!  Don't forget to add your blog to the post below in the comments!


Jul 15, 2013

Help my Need for Blog Feed!

ETA : If your feed disappeared also, read Tami's comment below - it's painless and works! But I'm still collecting blog urls!  And am still doing the giveaway - so post your blog and another in the comments!

--------------------
Hiya readers!  I switched over to Feedly when I heard Google Reader would be no more and I LOVE Feedly.  The problem is - I've ignored the very large warnings I would get when opening my Feedly - I needed to do something and I can't remember what that something was to retain my google reader feeds.

Alas - I lost ALL ... all ... did I say ALL? of my blog feeds.  So I'm starting from scratch.  I need to build up my Feedly feeds.  Yes - I did try to get my feeds back with "google takeout", but all I'm getting is gobble-de-goop.  The easiest thing to do is kindly ask/beg for blog suggestions.

So ... could you kindly link me up to your own blog and another blog you love so I can add these to my Feedly?  I have all sorts of categories, so it can be craft related but doesn't have to be ...

And to further entice you to help, I'll send out these goodies to the name I draw on Friday 7/19 10pm ET.  You'll find some vintage goodies I've collected, an extra favorite JBS stamp, Maya Road chipboard, and a collection of stars.


Thank you - I'll love adding you to my Feedly and following your adventures!


Jul 10, 2013

WOYWW


So I'm getting a bit smarter and since Wednesday is a work day for me, these pics are really Tuesday evening pics.  Works for this side of the pond, right?!

First are photos of my workspace in the evening as the sun moves over the house to the west ...


... i love this time of day ... but it's fleeting ... and I have horrible horrible lighting at night ... need to change that.


The layout from last week is STILL on my desk! But now it's cut to 8-1/2 x 11 now - LOL!


... and now there are practice butterflies floating around on it.


And speaking of butterflies ... also on my desk is a little project I did on vacation. I took a very small amount of supplies for our short vaca.  I had this idea of this butterfly and I love the way it came out.  The large jewel on top is actually a flea market find from that weekend.

Hope over to Julia's blog to see more WOYWW!


Jul 9, 2013

Creative Tuesday : Technique Tag Labels


I've been taking more technique focused classes and many of the classes teach their techniques on tags.  In order to remember the techniques and what I did to create my tags, I made a technique label sheet that I could cut up and adhere to the back of the tag with all the necessary information.


This tag was made in a class taught by the wonderful Marjie Kemper .   We learned a bunch of techniques on a bunch of tags and I knew I needed to jot down everything I learned before I forgot!


These labels are sized to fit on a 6-1/4 inch x 3 inch tag.  If you'd like this Technique Tag Label Sheet, you can download it here:

Have a Creative Tuesday!


Jul 5, 2013

Jul 3, 2013

WOYWW

Ah! two weeks in a row - love the WOYWW tradition Julia started - she's in week 213!


I primarily keep my favorite lens on my camera and rarely switch it out unless I need a zoom for sports or beach photos.  It's a great lens, but you really have to stand back if you want to get more of the area in your photo.  I'll have to switch out next time for WOYWW.  To get this shot, I was squeezing myself against the furniture ... nearly tipped it over ...

Anyway - I tried playing with gesso and gold paint this week.  Major fail! Perhaps it was the thick acrylic tube paint I had gotten, but mixing the 2 gave a strange reaction.  Since the gold paint was thick anyway, I went with that alone.  My goal was to embed sequins and glitter in the gesso and/or paint - it worked in this thick paint alone!

More stamping and digital die cuts - all of this is using the new July JBS Mercantile kit.  There's a roll of old wallpaper border in the upper left that I got at a flea market - a funny coincidence since I saw Jenni put some up for sale in this month's Flea Market!

Hopefully, this layout will be done by the next WOYWW!


Jul 2, 2013

Creative Tuesday : Little Bead Feet


I've registered for the class Technique Toolbox with Claudine Hellmuth at Big Picture Classes .  The class hasn't officially started yet, but part of the preparation work is to create your own little toolbox using pdf printables created by Claudine.  Her design is so adorable.  I love it.  And of course I wanted to do something to make it my own.  So I added little bead feet and changed up the handle supplied by Claudine and by using a door knob type topper instead.


I added some hardware to the corners and a half chipboard button, too.  But the bead feet - how I love the bead feet! I made these with cheap costume jewelry I found at flea markets that I disassembled for the "parts".


To make the feet I've attached the spacer and bead together with wire, "knotted" the wire at one end and inserted the wire through the box and secured it tightly inside with a good glue.


My next work in process is a simple kraft jewelry box from a store in town, that I'll dress up the same way:


Have a Creative Tuesday!